In this tutorial, you’ll learn how to animate your icons using Adobe Photoshop. Skill Level: Intermediate.
There are many reasons why you may want to animate an icon to help tell your story. A video may be too long and written words may not be illustrative enough. Audio might be too complicated and static images may not truly communicate your idea. Animation is a great way to add some whimsy and delight to your visuals, and making one isn’t as complicated as you may have thought. Animations can be used for social media, in email newsletters, on websites, in presentations, as branding, in lesson plans, as art, or even printed frame by frame and bound into flip books.
In this tutorial, you’ll learn how to produce beautiful animations with software you may already have.
Animation offers a medium of story telling and visual entertainment which can bring pleasure and information to people of all ages everywhere in the world.
— Walt Disney
Animation doesn’t have to look like the next blockbuster film to have impact. Even subtle animations can improve a static image. There are three key ways you can enhance an icon with animation: adding meaning, adding narrative, and adding delight.


Selecting Your Tools
Sometimes the best tool for the job is the one available to you. If you’re a skilled animator, Photoshop is probably not the tool you use for your work. We’re using Photoshop because it is one of the most commonly used design applications and relatively easy to use for those who are just starting to explore more complex design projects, like creating animated GIFs.
It’s not like the computer magically does it for you. Animation just takes forever.
—Stephen Hillenburg, Animator of Spongebob Squarepants
Millions of people around the world use Photoshop (🔷Ps) but may not quite know just how powerful it is. I’ve animated many icons over the years using a variety of methods and I’ve found that Photoshop is a really great tool for four main types of animation:
For this tutorial, we’re using the latest version of Adobe Photoshop Creative Cloud (2019) to create an animated GIF. You can use older versions of the software, but the features may work differently. GIF files are great for small animations that will live on the web. They are easier to manage than video clips and typically have much smaller file sizes.
👩🏽🎨 PRO TIP: Adobe Photoshop CC has a 30 day free trial and there are many programs for discounted licenses for students, faculty, and others.
Planning
Before jumping into Photoshop, it’s important to know why you are choosing to animate your icon. For this exercise, we’re going to animate an icon representing “animation” in order to promote this article on social media.
Our animation purpose is to bring the animation process to life for this tutorial and to inspire future icon puppeteers.
Choosing Your Icon
You can design an icon from scratch, or select one from the millions available on Noun Project. It’s best to use the vector version (SVG or Vector PDF) of the icon so you can make edits more easily. Simple icons work best, but I also like to look for small details that already convey a sense of motion. Identify the elements of the icon you can move, scale, or colorize to add meaning, narrative, or delight. I searched for “Animation” and “Puppet” icons on Noun Project, which lead me to this Puppet icon by Luis Prado. This one may be complicated for a first time animator, but I think it will demonstrate what’s possible with these techniques.

We’ll add motion by having the hand attempt to make the puppet come to life. Since the fingers are directly connected to the puppet’s arms, when we move each finger we can anticipate how it will affect the puppet. It is also nice that the puppet’s head is detached. I plan on having it bobble and flop around to give it some extra character.
👩🏽🎨 PRO TIP: Simple, bold icons work best for animation. Look for details that convey a sense of motion.
Storyboard Your Plan
I recommend starting with pencil and paper. Even if you don’t think you can draw, sketching an idea is one of the best ways to work through visual ideas because you can quickly iterate without any technical boundaries. By planning the key moments in your story, you won’t waste time and effort animating pieces that don’t help you accomplish your goal.
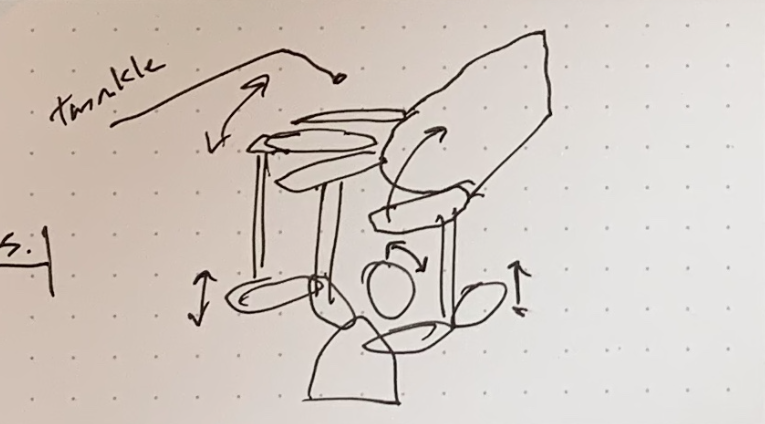
You only need a couple of boxes in a sketchbook to storyboard your animation. In your sketches, break down your icon into simple shapes that will represent the moving pieces. Add notes as you think of them and use this time to brainstorm what could make this animation truly great. The wrong time for a brilliant animation idea is after you’ve already spent time working in Photoshop.
The length of your animation will be determined by where it will ultimately live. For my work, I’ve found animations should be less than 10 seconds, otherwise the .GIF file will be too large and unusable. The sweet spot for .GIF files is 2–6 seconds, where the icon repeats or reverses the animation in a loop. I’m planning to make this animation loop after 2 seconds, so each box depicted below represents about a half a second.
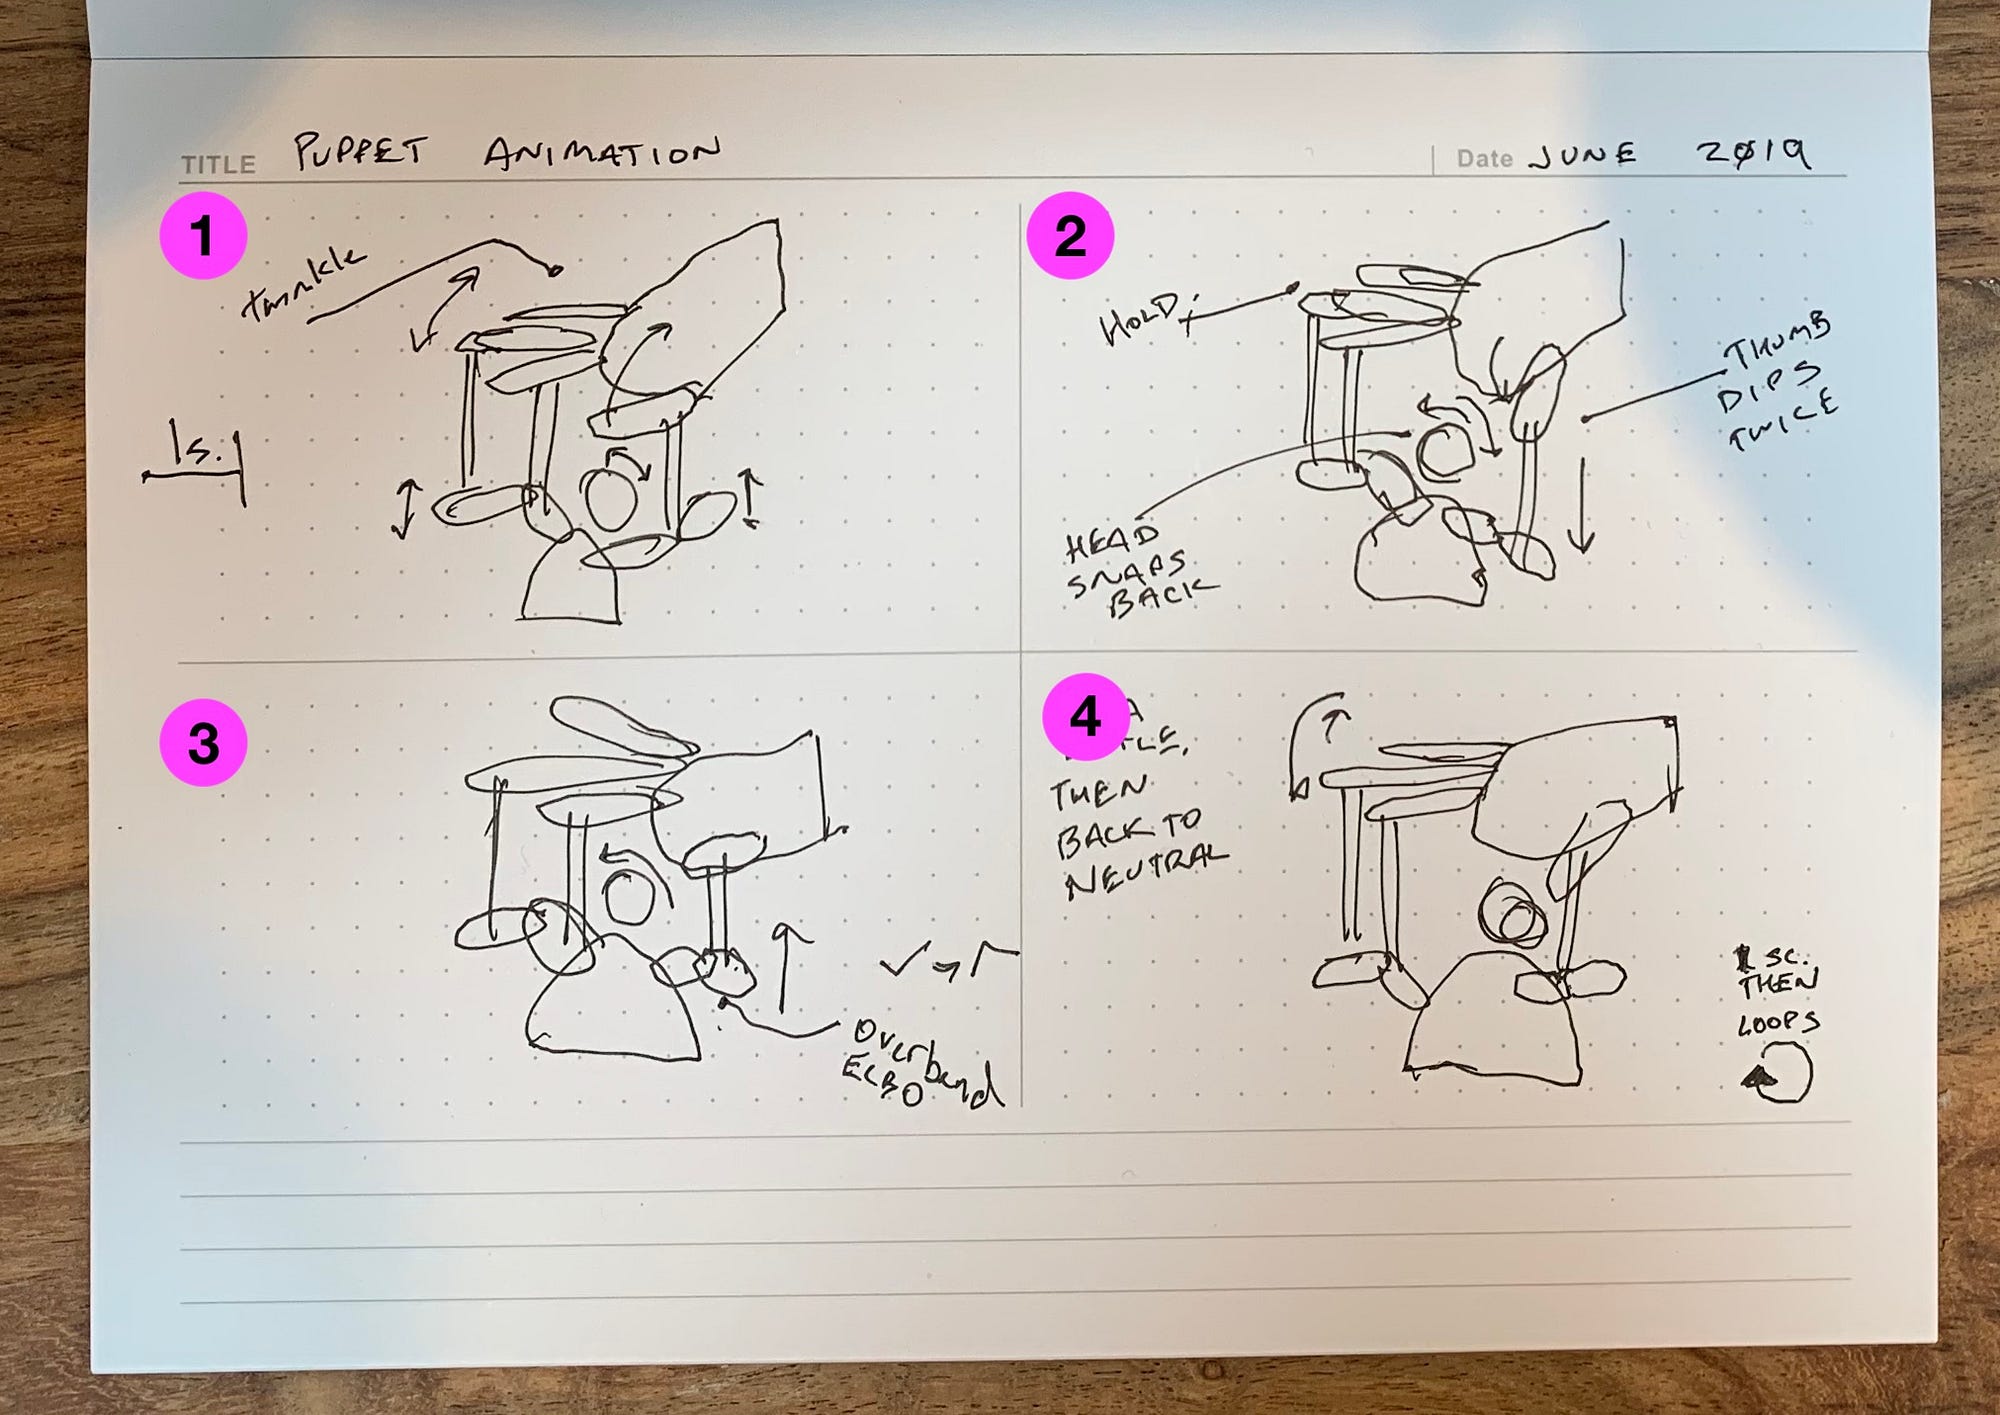
🎬 Scene One
The movement will start with the hand, then into the strings, and finally to the puppet. The fingers will flutter to “wake up” the puppet.
🎬 Scene Two
As the fingers stay extended, the thumb will dip quickly to move the puppet’s head.
🎬 Scene Three
Next, the thumb will dip a second time and the puppet’s right elbow will “over bend” and bounce the puppet’s head around.
🎬 Scene Four
The last frame of the animation will have the hand relax and all of the pieces will settle into their original places, allowing for a seamless loop.
Execute Your Plan
Now that you’ve got a plan in place, go ahead and open up Photoshop. It’s always best to start a new document for each project. Now is the time to refer to your research notes and see if there are any file set up considerations for where you plan to use the animation. For example, are you using this animation on social media or for a newsletter? If so, each of those channels will have unique considerations you’ll need to take into account for the final file’s resolution, dimensions, and more. (Common Social Media Sizes)
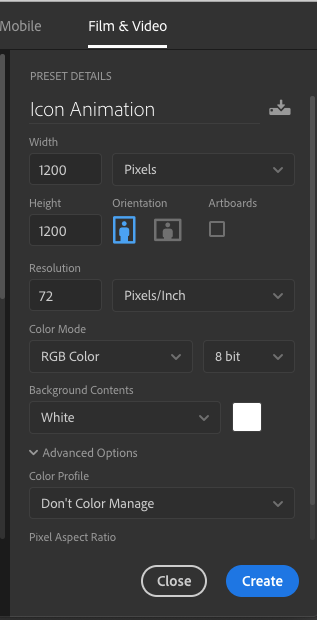
Dimensions. I like to use the Film & Video tab to create the animation template file. Social platforms like Instagram prefer square images, so our dimensions will be created at 1,200 pixels square. We’ll make a wider version for our newsletter later.
Color, Space and Background. Make sure you’re working in RGB Color since this will be viewed on a screen. I like to use white backgrounds for animating icons. If you prefer your background to be transparent, there may be some extra masking work you’ll have to do.
Separating the Icon into Layers
Since we are manipulating vector icons, preserving their editing and resizing capabilities is key to saving time while animating. However, Photoshop is optimized for manipulating raster images. This means using vector content in Photoshop isn’t always the easiest. I’ve found four different methods to create the vector layers needed for animating.
- Trace Elements with Pen Tool: This method is great when the icon is simple. Only trace the parts that move, mask out the duplicate parts.
⚠️ Gives you most control, but takes practice. (Beginners Tutorial) - Copy & Paste from Illustrator: This is the easiest option, but requires Adobe Illustrator installed. Open the
.SVGfile in Adobe Illustrator. Select the vector shapes for your layer and copy to the clipboard. Then you just paste them into Photoshop and selectShape Layerfrom the menu.
⚠️ Fairly easy, but requires Illustrator. (Tutorial) - Use SVG layers plugin: This Photoshop plugin will get you the
.SVGfile as vector layers very easily, but comes with a cost.
⚠️ Easiest, but requires paid plugin ($20 Download) - Load the icon as a Custom Shape: This method is totally free, but requires the most steps. You first generate a
.CSHfile from your.SVGfile and import it as a new custom shape.
⚠️ Free, but most time consuming steps (Tutorial)
I chose Method 1 for this animation. Tracing each moving part using the vector pen tool will give me the most control for how the movements will interact with each other. If you are animating the whole icon at once, such as a loading spinner, the other methods would be better.

Each moving part has its own layer. Overlap shapes to keep them from separating while moving. This process takes time, and usually I’ll make small adjustments to each layer as I work.
👩🏽🎨 PRO TIP: Thoughtfully group and name layers to save you time in the animating process.
When Shapes Cut into Other Shapes
In the original icon, the middle finger cuts into the pinky but we want to reveal more of the pinky as it moves up in the animation. In order to get the “cut out” look as it animates, we’ve created white masks that overlap the lower layers. They are grouped to the finger the white space should move with. This technique is used with both the index and middle fingers and results in a more natural animation.

When to use Smart Objects
Converting “Vector Shape” layers into “Smart Object” layers allows animation of the “Transform” properties instead of the “Vector Mask Position.” You can still accomplish a lot without this step, but if you need to animate the rotation of a layer, you have to use the “Transform” properties. For this reason I convert all my shape layers to smart object layers by right clicking each moving layer or group and selecting “Convert to Smart Object.” If you need to edit the vector points of the smart object, you can double click the layer thumbnail.
Create a Timeline
There is a mini motion graphics application hidden inside of Photoshop. You can view the Timeline panel by navigating to Window > Timeline. Creating a timeline lets you assign property changes to the different layers based on time (think of video or audio editing software).
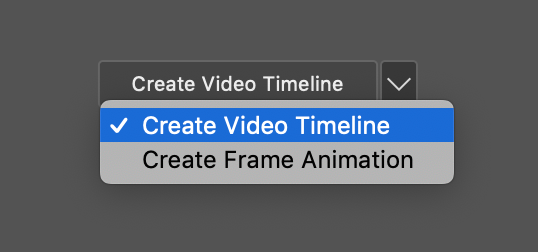
There are two modes in the Timeline panel: Video Timeline and Frame Animation. Frame Animation, like an old Disney Classic, has each frame drawn and if you flip through them quickly, your eye sees the animation. (Tutorial on Frame Animation).
Video Timeline, like Pixar, has each animated element modeled in software, then the movement is scripted and “programmed.” I’ve decided to use the more robust Video Timeline Mode so we can manipulate smoother movement and make easy changes later.

👩🏽🎨 PRO TIP: From the
Window > Workspacesmenu, choose theMotionworkspace and attach the Timeline panel to the bottom of the Photoshop window by dragging it all the way to the bottom until you see a blue bar.
Animating Your Storyboards
Adjust the looping time of the animation. At the top of the Timeline panel is the actual timeline with the frame numbers displayed across the top. I chose 30 frames per second when creating the Photoshop file so every 30 frames is a marker for that second. 04:00f stands for 4 seconds and 0 frames. This animation will run about 2 seconds, so we moved the end of the timeline to 02:00f by dragging the “Set end of work area” handle. You can preview your animation by pressing the play button (or press spacebar). Now, it will now loop after 2 seconds (60 frames).

Layer by Layer
Next, animate layers to create each frame in your storyboard. Find where the movement starts in the first storyboard panel. That is where you will begin animating. Referencing your storyboards, identify the layer you’ll start with and what it needs to do.
Our first scene starts with the three fingers lifting. To add the “twinkle” effect, I’ll lift the pinky finger slightly before the others. To animate the finger lifting, all we need to do is rotate the pinky layer.
Rotating the Pinky Layer (as shown above)
From the initial resting position, move the Playhead to where this layer starts moving. Then use the “Keyframe” tool on the “Transform” property in the Timeline panel. (If you were fading a layer in or out, use the “Opacity” property)
Next, move the playhead to where you want that layer to stop animating. Here you’ll transform that layer into the final state of this storyboard frame. In our case we want to rotate the finger from the knuckle on the hand. Select the layer then navigate toEdit > Free Transform from the menu. You can drag the reference point to where it will pivot.
Once your layer is in its resting point for that movement, click the diamond to add a new keyframe at the playhead. You can then move the playhead back and forth to see your animation work. You can make adjustments by lining the playhead back up with your keyframe and adjusting the transform.
👩🏽🎨 PRO TIP: Because Photoshop resets the reference point after each transformation, I like to choose a point it can snap to so I can easily remember and consistently align it. (This tutorial has great methods).
- For more complicated movement, add more keyframes.
- To make something speed up or slow down, space keyframes closer together or further apart.
- Experiment, take notes, and get friendly with the “Undo” command.
Repeat for all moving elements in your first storyboard frame. Review your work often to see how your animation works throughout the process and make the necessary adjustments.
👩🏽🎨 PRO TIP: If you don’t see a center point make sure to check the “Toggle Reference Point” box while in Free Transform mode.

Animate the Rest of your Storyboard Frames
Once you’ve created all the layer animations for a storyboard frame, you can repeat the process for the remaining storyboard frames. Working from start to finish helps you understand the timing of each element.
The Final Frame
If your animation loops the final storyboard frame should end exactly where the first storyboard frame begins. If anything is different you will see a jump in the animation. An easy way to solve this is that when you are creating your very first keyframe to start at least a few frames into the animation. Then at the end you can create a new frame at 00:00f and drag it to the very end.
Fine Tuning your Animation
Now that you’ve animated everything you’ve planned you can iterate until the animation feels right and accomplishes your goal. I spent a little time experimenting with how much the head bobbled around.
👩🏽🎨 PRO TIP: When adjust timing, drag–select multiple keyframe diamonds at once to save time and keep animations relative to each other.
Export & Optimize
Congratulations! 🎉 You’ve animated an icon! Now it’s time to export the file. Before you do anything else, make sure you have a saved .PSD version of your animation and make a backup. I often have to make many adjustments after exporting based on where the final animation is used.
We’re using animated GIF files because GIFs are one of the easiest ways to use animations, especially on the web. In order to export as a .GIF file you must use the “Save for Web (Legacy)” dialog box. Navigate to File > Export > Save for Web (Legacy).... Once it loads, change the file format to GIF from the dropdown. You may also want to change the Zoom Level to “Fit In View” so you can see the entire animation in the preview window.

To make sure animations load quickly, you want files that are as small as possible, while not compromising too much on quality. Animations used on the web should be less than 1Mb (1,000Kb). If you’re using these animations for presentations, they can be a little bigger, but I often find that the 1Mb rule is a good standard to keep in place for all of your projects.
Four Ways to Manipulate File Size
Experiment and get to know the different settings for exporting files from Photoshop. After changing a setting, look at the File Size indicator in the bottom left.
- Animation Length: Shorter animations typically have smaller file sizes.
- Export Dimensions:
.GIFfiles are raster based, so the more pixels there are, the more information in the file, which makes it larger. - Color Range: If your animation is of solid, simple colors limiting the color range can help reduce file size by removing visually unnecessary color information from the exported file. Be careful if you have any opacity though.
- Optimizers: There are websites where you can “optimize” your file. I’ve had mixed results. Normally they remove meta data, or reduce the frames per second. Sometimes you won’t notice it, other times it’s the only thing you will notice.
Looping
Animated .GIF files can execute once, a specified number of times, or loop forever. Use the Looping Options dropdown menu to select what your animation needs. For most animations I make I choose the loop option.
Transparency
If your animation needs a transparent background, or other transparent parts, make sure that those options are selected before exporting. Otherwise, if you didn’t include a background layer, you can add the correct “Matte Color” that will be applied underneath your animation.
Save the File
Once you feel good about the settings, hit the Save button and save to your computer. (Don’t accidentally press “done” like I always do) Always test your animated GIF after exporting to confirm the animation is smooth and free from any pixilation or color errors.

Closing Thoughts
This particular animation may be more complicated that what you try, but now that you have the basics, you can bring any icon to life.
Please share your animation with us on Facebook, Instagram, and Twitter by tagging @nounproject and use the hashtag #iconanimation.
For even more tips, tricks,
and tutorials, follow me @geremygood.
Additional Resources
- Download the Icon Animation Template
- Download project files for this tutorial
- Some of our favorite Noun Project icons
- Education discounts on Adobe Photoshop CC
- Education discount on Noun Project subscription
- Helpful tutorial on rotating elements in 🔷Ps
- Helpful tutorial on Shapes & Vector Paths in 🔷Ps
- Social Media Image Sizes
- GIF Compressor (Ad blocker recommended)
Noun Project Icons Featured

- Puppet by Luis Prado
- Unlock by Noun Project
- Plant by Noun Project
- Chat by Noun Project
- Idea by Noun Project
- Clock by Noun Project
- Heart by Noun Project
- Bicycle by Noun Project
- Brain by Glyph.faisalovers